Java:「Future」与「FutureTask」
这次我想分析Future接口的get方法在Java的Executor框架下是如何实现的。
写demo代码如下:
public class FutureAndCallableExample {
	public static void main(String[] args) throws InterruptedException, ExecutionException {
		ExecutorService executorService = Executors.newSingleThreadExecutor();

		Callable<String> callable = () -> {
			// 做一些操作
			Thread.sleep(2000);
			return "Hello, Martian!";
		};

		Future<String> future = executorService.submit(callable);

		String result = future.get();

		System.out.println(result);

		// 关闭所有tasks,防止同一个thread group里面的task导致main thread被block住无法退出。
		executorService.shutdown();
	}
}
上面的代码中,我们使用「Executors」获得一个「ExecutorService」,然后往executor service里面submit了一个「Callable」的task,并得到一个future。
这时我们知道自己的task会被executor service执行,最后我们从future里面get结果。我们知道future的get方法会block住当前thread,直到任务执行结束,返回结果。
接下来就是要分析上面这个流程是如何实现的。
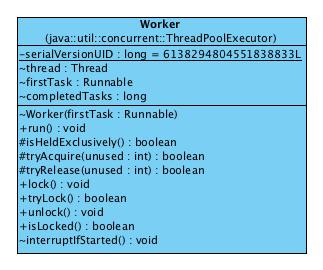
首先需要知道的是,从Executors里面得到的各种ExecutorService,其实本质上都是扩展「ThreadPoolExecutor」。在这个「ThreadPoolExecutor」里面,包含了很多核心设计。
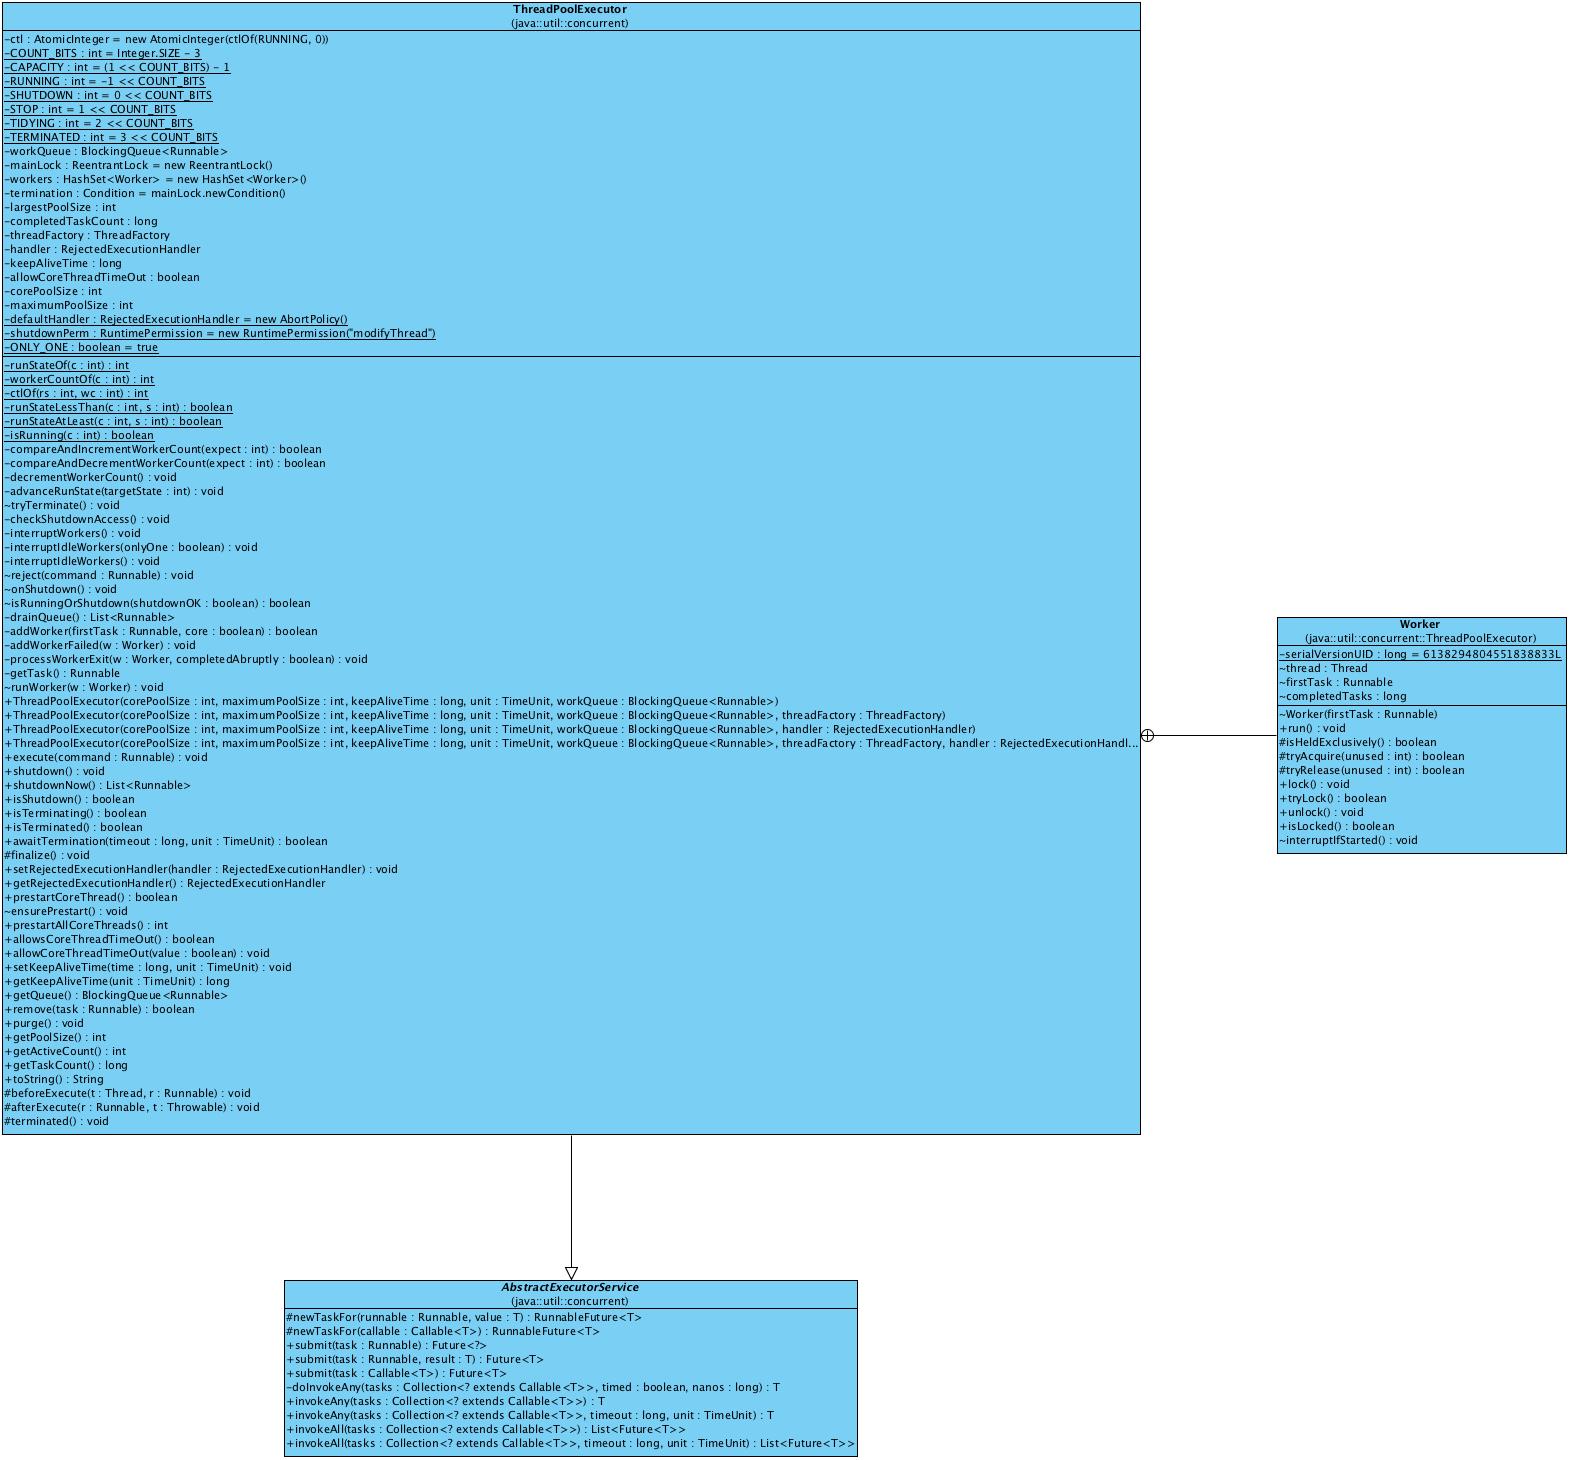
从上面的类图中可以看到,「ThreadPoolExecutor」是一个比较重型的class,它扩展了「AbstractExecutorService」,并且包含一个「Worker」。
接下来我们可以看看executor service的submit方法的内部实现:
可以看到,submit方法是在「AbstractExecutorService」里面实现的。首先把我们的task通过newTaskFor方法进行封装。这个方法的代码如下:
protected <T> RunnableFuture<T> newTaskFor(Callable<T> callable) {
	return new FutureTask<T>(callable);
}
注意到我们的Callable类型的task被封装成了一个「FutureTask」。这个FutureTask也是一个核心设计,我们来看看它的相关类图:
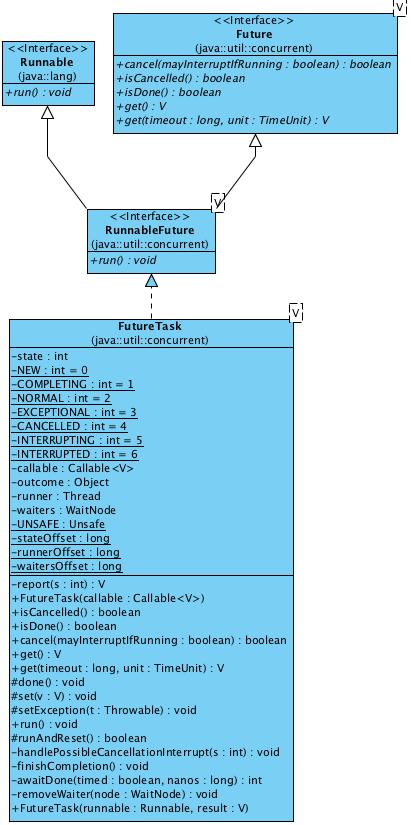
能够看到FutureTask与Future及Runnable这两个接口之间的关系,而FutureTask里面实现了很多具体的功能,这里面的设计也是我们在这篇文章里面要重点看的。
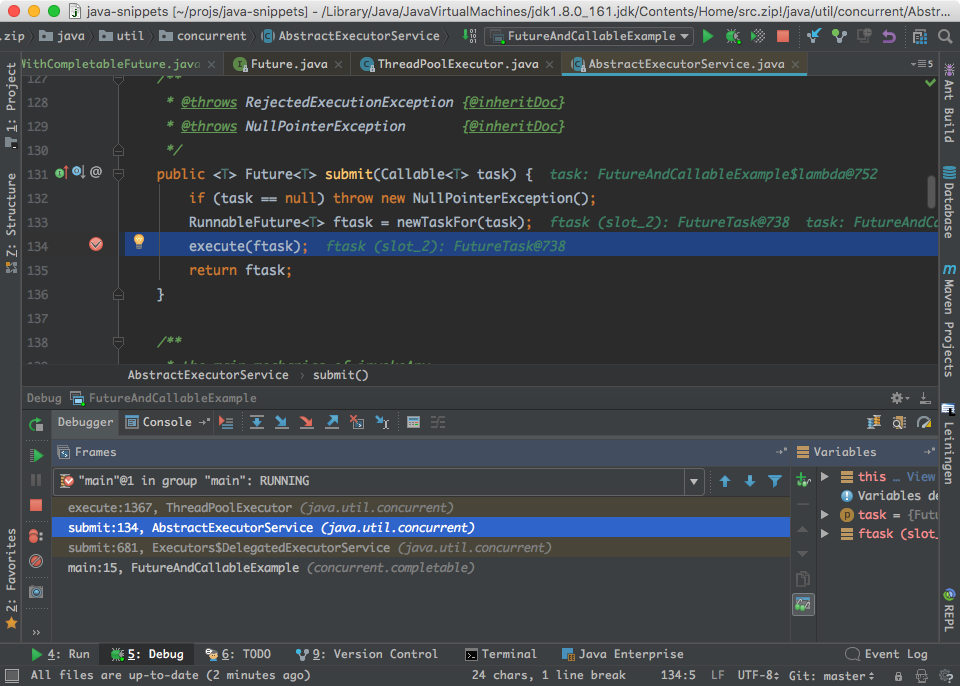
回过头来继续看AbstractExecutorService的submit方法:
public <T> Future<T> submit(Callable<T> task) {
	if (task == null) throw new NullPointerException();
	RunnableFuture<T> ftask = newTaskFor(task);
	execute(ftask);
	return ftask;
}
得到了封装好的task以后,接下来就是执行这个task,也就是上面代码当中的execute方法。在execute方法里面设置断点,重点如下所示:
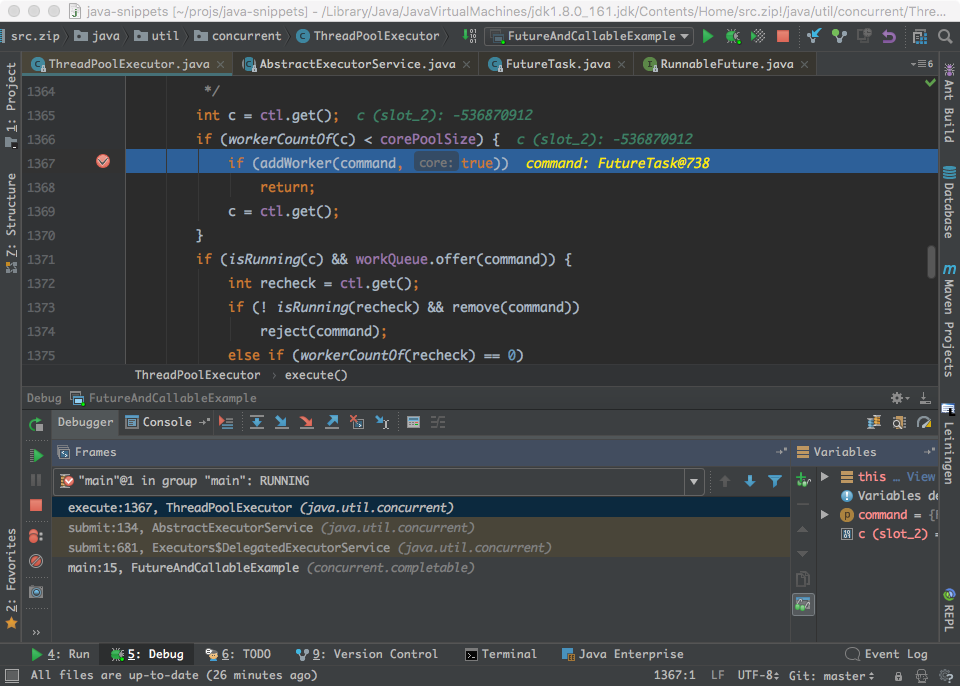
可以看到这个execute方法是在ThreadPoolExecutor里面实现的。代码的重点如上所示,就是把command(也就是传入的task)添加进worker。
在上面的类图当中,我们看到了Worker类型,它是ThreadPoolExecutor里面的一个inner class,用来封装task并运行task:
Worker包含一个thread,用来运行task,然后包含一个firstTask,用来代表ThreadPoolExecutor中的首个待运行task。而ThreadPoolExecutor从上面的类图中可以看到,包含一个workQueue,用来存放需要运行的tasks。
此外,Worker自身实现Runnable接口,所以它的run方法就是用来执行task的逻辑所在。它的run方法的代码如下:
public void run() {
	runWorker(this);
}
这个run方法调用runWorker方法,而runWorker方法是由包含Worker的ThreadPoolExecutor提供的。
「runWorker」方法的代码如下:
final void runWorker(Worker w) {
	Thread wt = Thread.currentThread();
	Runnable task = w.firstTask;
	w.firstTask = null;
	w.unlock(); // allow interrupts
	boolean completedAbruptly = true;
	try {
		while (task != null || (task = getTask()) != null) {
			w.lock();
			// If pool is stopping, ensure thread is interrupted;
			// if not, ensure thread is not interrupted.  This
			// requires a recheck in second case to deal with
			// shutdownNow race while clearing interrupt
			if ((runStateAtLeast(ctl.get(), STOP) ||
				 (Thread.interrupted() &&
				  runStateAtLeast(ctl.get(), STOP))) &&
				!wt.isInterrupted())
				wt.interrupt();
			try {
				beforeExecute(wt, task);
				Throwable thrown = null;
				try {
					task.run();
				} catch (RuntimeException x) {
					thrown = x; throw x;
				} catch (Error x) {
					thrown = x; throw x;
				} catch (Throwable x) {
					thrown = x; throw new Error(x);
				} finally {
					afterExecute(task, thrown);
				}
			} finally {
				task = null;
				w.completedTasks++;
				w.unlock();
			}
		}
		completedAbruptly = false;
	} finally {
		processWorkerExit(w, completedAbruptly);
	}
}
上面代码的核心就是这一行:
task.run();
就是把我们的task给跑起来。而之前看了,这个task是被封装成FutureTask的,因此我们要看的是FutureTask的实现。
在看FutureTask之前,我们先回到上面的「ThreadPoolExecutor.addWorker()」方法。在上面建立了一个Worker,把firstTask放到里面之后,「addWorker」方法后续做的事情就是让worker把task跑起来:
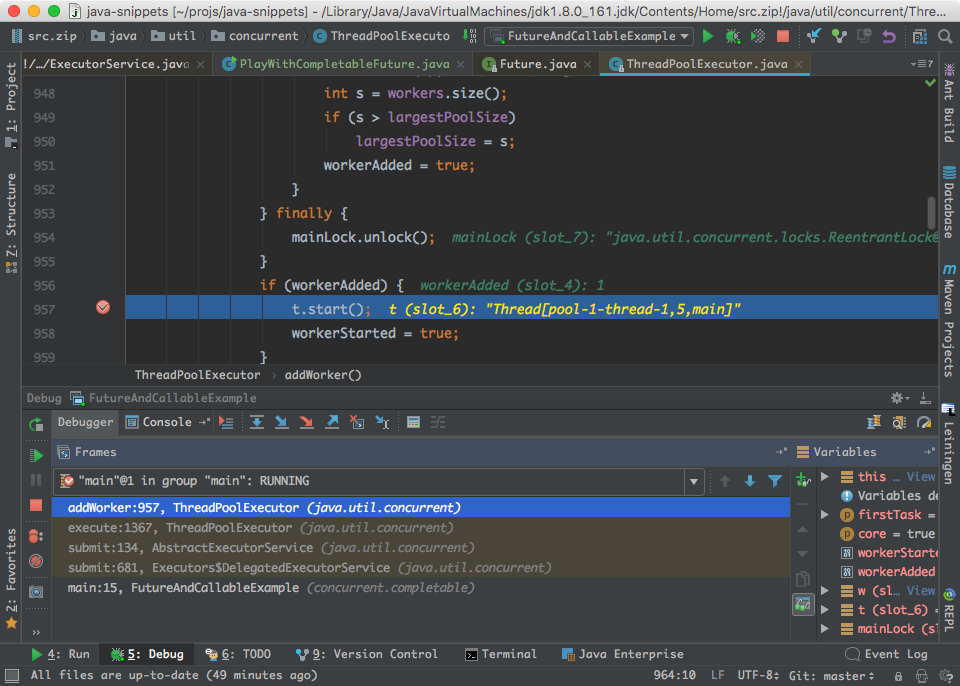
上面的这个t就是worker里面取出来的那个thread,这一点在「addWorker」方法的代码里可以看到:
w = new Worker(firstTask);
final Thread t = w.thread;
而这个thread要跑的任务就是worker自己,这一点可以在Worker的constructor里看到:
Worker(Runnable firstTask) {
	setState(-1); // inhibit interrupts until runWorker
	this.firstTask = firstTask;
	this.thread = getThreadFactory().newThread(this);
}
注意上面的thread传入的task就是worker自己。因此,这个thread所执行的,就是worker的run方法。而我们上面看到,worker的run方法执行的是runWorker方法:
public void run() {
	runWorker(this);
}
因此,我们现在就又回到对「runWorker」方法的分析了。上面讲了,这个方法的核心代码就是这一行:
task.run();
这个task就是封装了我们的Callable类型的task的「FutureTask」。因此,现在我们可以着手分析「FutureTask」的run方法了。下面是FutureTask的run方法的代码:
public void run() {
	if (state != NEW ||
		!UNSAFE.compareAndSwapObject(this, runnerOffset,
									 null, Thread.currentThread()))
		return;
	try {
		Callable<V> c = callable;
		if (c != null && state == NEW) {
			V result;
			boolean ran;
			try {
				result = c.call();
				ran = true;
			} catch (Throwable ex) {
				result = null;
				ran = false;
				setException(ex);
			}
			if (ran)
				set(result);
		}
	} finally {
		// runner must be non-null until state is settled to
		// prevent concurrent calls to run()
		runner = null;
		// state must be re-read after nulling runner to prevent
		// leaked interrupts
		int s = state;
		if (s >= INTERRUPTING)
			handlePossibleCancellationInterrupt(s);
	}
}
把上面的代码的核心逻辑提取出来,就是几两行:
Callable<V> c = callable;
V result;
result = c.call();
set(result);
上面的c,就是封装进FutureTask的我们的Callable类型的任务本身,然后我们调用任务c的call方法,执行任务,并把任务放进result。最后,使用set方法处理result。
我们看看set方法的代码:
protected void set(V v) {
	if (UNSAFE.compareAndSwapInt(this, stateOffset, NEW, COMPLETING)) {
		outcome = v;
		UNSAFE.putOrderedInt(this, stateOffset, NORMAL); // final state
		finishCompletion();
	}
}
上面的代码中,核心就是这行:
outcome = v;
这个outcome就是我们的callable任务执行完的结果了,会放在FutureTask的这个outcome变量里面。
以上就是我们在executor service里面submit一个任务的全流程,在这里梳理一遍:
- 我们通过Executors得到一个ExecutorService
- 我们创建一个Callable的任务
- 我们把callable的任务submit进ExecutorService
- ExecutorService把我们的callable任务封装成FutureTask
- ExecutorService帮我们管理运行task所需要的thread,并把thread和task都交给worker去执行。
- worker负责在thread里面执行task。
- task的类型是FutureTask,在内部执行我们的callable task,并把结果放在内部的outcome变量里。
到最后,我们通过executor service的submit方法得到的就是FutureTask。此时我们知道,我们自己的task在这个FutureTask内部正在执行,而且最终结果会放在FutureTask内部的outcome变量里。
而我们最后要做的就是调用FutureTask的get方法,取得结果了:
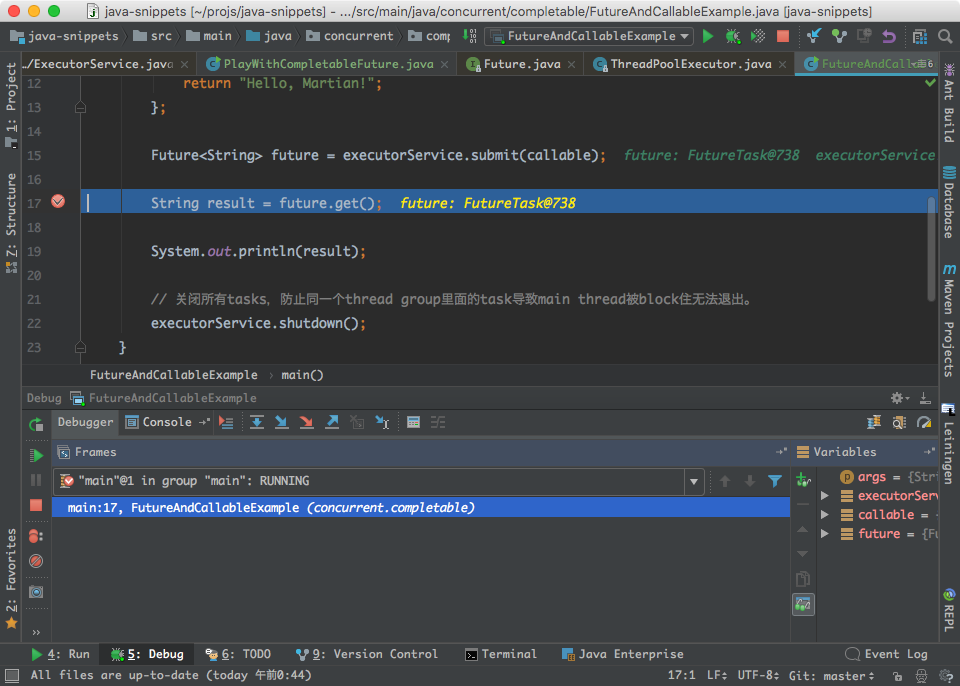
这也是我们最后要分析的设计了,就是FutureTask的get方法。这个方法的代码如下:
public V get() throws InterruptedException, ExecutionException {
	int s = state;
	if (s <= COMPLETING)
		s = awaitDone(false, 0L);
	return report(s);
}
上面的get方法的逻辑比较清晰,首先是要执行awaitDone方法,等待任务的执行结果。这也是为什么Future的get方法会阻塞thread的执行,从FutureTask的实现上找到了答案。
我们看看awaitDone方法的代码:
private int awaitDone(boolean timed, long nanos)
	throws InterruptedException {
	final long deadline = timed ? System.nanoTime() + nanos : 0L;
	WaitNode q = null;
	boolean queued = false;
	for (;;) {
		if (Thread.interrupted()) {
			removeWaiter(q);
			throw new InterruptedException();
		}

		int s = state;
		if (s > COMPLETING) {
			if (q != null)
				q.thread = null;
			return s;
		}
		else if (s == COMPLETING) // cannot time out yet
			Thread.yield();
		else if (q == null)
			q = new WaitNode();
		else if (!queued)
			queued = UNSAFE.compareAndSwapObject(this, waitersOffset,
												 q.next = waiters, q);
		else if (timed) {
			nanos = deadline - System.nanoTime();
			if (nanos <= 0L) {
				removeWaiter(q);
				return state;
			}
			LockSupport.parkNanos(this, nanos);
		}
		else
			LockSupport.park(this);
	}
}
可以看到awaitDone方法的目的主要是判断自身的状态,以及结合timeout时间,来决定任务是否完成了。
回到get方法,接下来是这行代码:
report(s);
我们看下report方法的代码:
private V report(int s) throws ExecutionException {
	Object x = outcome;
	if (s == NORMAL)
		return (V)x;
	if (s >= CANCELLED)
		throw new CancellationException();
	throw new ExecutionException((Throwable)x);
}
可以看到就是取出outcome,返回给用户。
通过上面的一系列分析,相信大家对Java的并发库围绕着Future接口展开的一系列设计与实现已经有了深入了解。这也是为什么Java鼓励大家使用标准的Executors这一组工具来执行自己的任务,而不是自己管理threads和任务。也不建议大家自己实现Future接口,而是使用围绕着Executor展开实现的FutureTask。
其实,学习Java的标准库,就是学习专家经验。还是那句话:并发库这一块主要是Doug Lea设计并实现的,代码很值得阅读和学习。